How to Make Denim Yarn From Old Denim Jeans: A Tutorial

I’ve been working on this one for a while. And boy, am I glad to have this one crossed off my list!

Where to start? I saw a braided wool rug on Pinterest (where else?) and thought that it would look great in denim. So, off I started to figure out how to make the strips to make braids and then (eventually) get it made into a rug.

Of course, the way I envisioned the rug, it would have to be many shades of blue, worn to perfection by being worn. I have always been a big fan of denim quilts, having made many of them, so I know that it all had to start from old pairs of blue jeans. And since The Kid and I are big fans of thrift shopping, so a new item was added to the shopping list. And its great, you can find a variety of sizes and denim qualities and colors easily. And I found jeans in size 58! Do you have any idea how much fabric that is?

DSCN4414

So, I’m getting ahead of myself. I did a test and took pictures so that I could write a tutorial on how to turn old jeans into a braided rug.

  1. Collect from your closets old and unworn jeans. You can also get them from friends and co-workers; I once posted a note in a common area and my co-workers rewarded me with over two dozen pair! Also, as noted, I also buy them from thrift stores; keep an eye open for when they run specials… in this case, the two pairs of jeans I bought were on a day when the thrift shop had half off orange tags:

DSCN4407

2. Next, you have to harvest the fabric. I created a tutorial on how to do this with the least amount of waste, you can see it here. This is what I have when I finished taking apart this pair of jeans:

3. Because I am a quilter, I have a cutting mat and rotary cutter, but you could achieve the same results with scissors. Cut the fabric into 3″ strips, maneuvering the material to get the most uninterrupted strips. I find that this does not have to be cut on the grain, in fact, there is more ‘give’ later when you’re braiding if you do not.

IMG_3567

4. Cut the strips, using all the fabric. I collect the smaller pieces and have used them in making denim quilts.

IMG_3568

5. You’ll want to trip edges to make them even, including the top strip even though you will only get about 8″ of fabric that measures 3″ wide.

IMG_3570

This represents all of the strips from this single pair of jeans and the scraps.

6. I then separated the strips into three piles roughly equal and joined the strips with a single zigzag stitch along the edges. This resulted in each of the three pieces being about XXX” long.

IMG_3572

7. Now, moving to the ironing board, we’re going to turn these strips into binding by turning the two edges to meet in the middle and then ironing in place:

8. This sets the crease making it easier to then sew together. Moving now to your sewing machine, I fold the two folded edges together…

IMG_3609

…and sew a seam a scant eighth of an inch from the edge. This locks the rough edges inside and will reduce the amount of fraying and lengthen the life of your rug. I found this to be a process that requires special attention, as you’re sewing through about four layers (and up to eight on seams), so I had to guide it through the tough areas or I would be looking at multiple broken threads on each length. I also used a heavy duty thread to minimize breaks.

9. At this point, you need to repeat the last couple of steps until all your strips have been turned into (what I referred to as) denim yarn. It is then ready to turn into a rug.

IMG_3618

Each of these lengths are approximately 39 feet. In this case, since it is a single pair of jeans, the color is uniform, but if you’re making lots of denim yard for a large rug, vary the color and value will result in a more interesting rug. The older the denim is, by the way, will also result in a softer rug under foot.

10. I overlapped but offset the ends of the three pieces of denim yard and sewed them securely.

IMG_3619

11. Then it is time to braid!

IMG_3624

I had my son hold the ends with a pliers so that I could really tug hard as I braided, but you could also loop it over a door or some other brilliant way (share with me how you do it!). I then braided the three lengths.

IMG_3628

I simply clipped the ends together and then wound the braid into a circle. The total length of the braid was just under 39 feet and ended up being a circle with a diameter of 12 inches. I didn’t take a lot of time winding it, but normally I would take more time to make the braid lay flat and sew them together while winding.

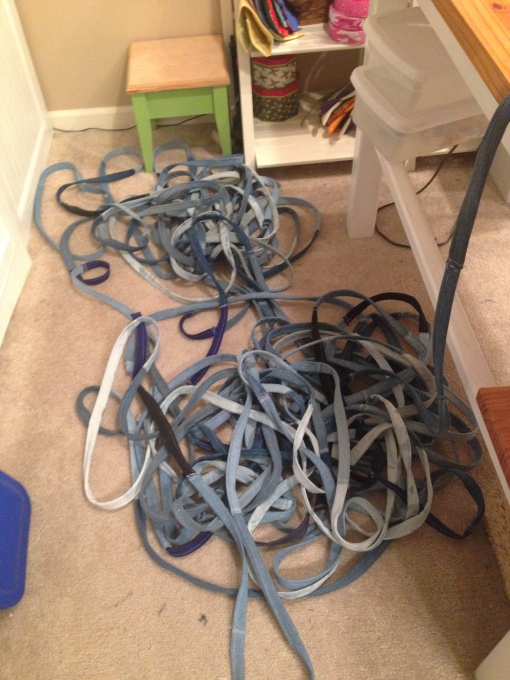
So, there are the instructions for making denim yarn and turning into braid. I’ve been working on my yarn for some time and started with this prepared bundles:

IMG_3489

The step I left out of the instructions that I used here, was to wind the three inch lengths of fabric into rolls to make it easier to work with. I found after a while that the 39/40 feet length was about as long as I wanted to make the yarn and still be able to easily work with it without tangling. I think it is a matter of preference and offer the length that works for me. I also started sewing about four inches down on each length (and end about 4 inches before the other end), so later when I begin braiding, I can quickly connect the lengths and continue braiding.

Many hours of ironing and sewing went into turning those rolls into this yarn (isn’t there some beautiful variances in color?):

IMG_3655

Which when tidied up and stacked neatly looks like this:

IMG_3656

The next step is to start braiding!

julie

Two Words: Prewound Bobbins

So, I am working diligently to get everything done and organized before surgery, now just nine days away. Wow… I am both so excited and terrified at the same time!

But work continues on the braided rug made of old jeans. After finishing cutting and harvesting denim from more than a hundred and fifty pairs of jeans… probably closer to two hundred. I’ve sold the back pockets on eBay for a nice little bit and I’ve sewed together all the inseams and bottom seams and have (mostly) fashioned them into bags and purses. I say mostly because I’ve still to find a tailor or perhaps shoe repair place that can do the final seams and attach handles as my somewhat specialty sewing machines just can’t do more than twelve layers of denim and/or leather (handles or straps). I am excited about finishing them though, they are going to be tré chic when they are complete.

The three inch strips of denim are, for the most part, now combined to form reasonable lengths. It took some time and experimentation to figure it out, but I’ve landed on a length that I think will be most productive when I start braiding. I’m taking lots of photos and making tons of notes, I think I am going to do a in-depth tutorial on creating these rugs from start to finish, that is, starting at the very start to include collecting jeans and harvesting the fabric all the way through to the finished rug. So, I won’t put too much of that into these posts pre-tutorial.

IMG_3480But I did do something that I thought I’d never do while in the process of turning the three inch strips into the finished strip for braiding. And that was to buy pre-wound bobbins.

s-l1600
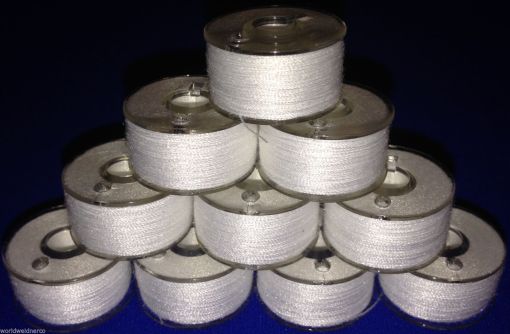
I don’t know why, exactly, I hesitated to do so, maybe something leftover from an early home-ec class or something about being thrifty and always winding your own bobbins. And heaven knows that I have enough bobbins and don’t really need to invest in more. But I found that with all the basic sewing that I’ve been doing, I have been just going through tons of bobbins and to sit and wind bobbins seems to be the most essential waste of time. Additionally, the pre-wound bobbins that I purchased seem to be wound very efficiently, that is to say, it seems to be twice as much thread on the bobbins than when I wind them, so I find that I am not changing bobbins as often. Which is awesome… again with the amount of basic sewing I am doing, nothing is as irritating just getting into a groove of sewing just to have the bobbin run out. And as my machine is overdue for maintenance, the bobbin sensor is getting in the habit of not alerting me and I find that I can run through feet of sewing before I realize that its not stitching! Argh!

So, here is officially my stamp of approval on pre-wound bobbins. They’re not overtly expensive (I get mine off eBay), they save me both time and frustration and they are help saving my sanity! Can’t think of better reasons to use them!

So, do you use pre-wound bobbins? I’d love to get the impressions of others who do a lot of sewing. Ever tried them? What’s your take?

julie


Forever in Blue Jeans

So, I’ve finished (for now) cutting all the blue jeans collected into three inch strips. I had set aside all the remaining pieces for making jean quilts. I’ve been working up the courage to start the rag rug… for whatever crazy reason, I always seem to go overboard when putting together the materials necessary for a project. Based on the tutorial I saw online for the rug, I now estimate that the amount of material that I have put together, I think I will probably end up with a forty foot diameter rug! I don’t know what it is that always makes me overestimate everything, but it seems that every project I work on, I do this.

DSCN4264This is the strips I’ve made… this has got to be the result of at least a hundred pairs of jeans and then some. I pick up pairs of jeans and just the denim material where ever I go, and recently procured a bunch when I picked up all that material free from CraigsList. And it was only recently that I started saving the back pockets – and I now have more than 100 pairs – so, I know that there were more pairs of jeans than those.

I made a “test” rug using 1 inch strips, that did not pan out too well. However, I think that fact that it was smaller was part of the problem. I need to fold the three inch strips into itself, so that the rough edges are hidden. I have been considering doing the folding and sewing it closed that way, but just haven’t decided.

DSCN4267

Anyway, I sat down and just started sewing the denim scraps. At first, it was just to get an idea of how well it would work, but after a while, I just got lost in it. I started watching Alfred Hitchcock’s 1950’s series and kept sewing. I was working with 7″ cotton squares as a starting point. On and off sewing over the past week or so, and I’ve finally made my way through the majority of the denim scraps. I didn’t want to make any squares with too many seams, the denim gets thick quickly and I know longarms don’t love to hit those seams where the material is thicker than four layers or so. I decided to make the squares as simple as possible and to keep those intersecting seams to a minimum.

IMG_6897
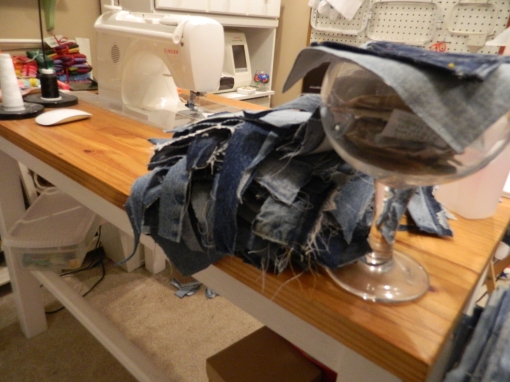
Yesterday, I used the last really good piece of denim and stacked them and did a count.

IMG_0296
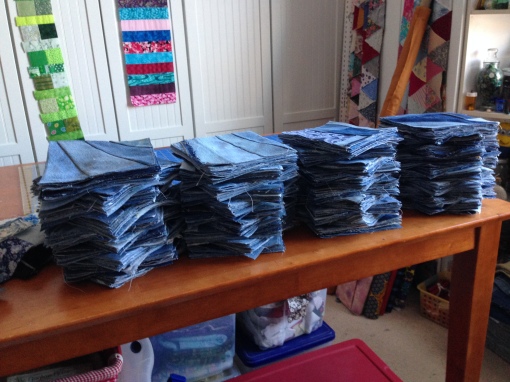
That’s 422! At 10 x 10 squares – about 70″ x 70″, that would make at least four quilts! I was thinking about working with some colored denim – red, I think – as a medallion pieces and then placing the blue denim squares on point around it.I briefly considered double sided quilts, but then I would be right back to the problem of thickness and seams. And that each quilt would weigh like a hundred pounds! Ha!

Now that I’ve used up the scraps, however, leaves me with trying to finish up my other projects before surgery. Just three weeks now before the scheduled date and I’ve still a handful of projects to complete in the garage. I am making headway on them, but the temperatures in the 20’s have made it a bit cold to be working in the garage. It should be a bit warmer today though.

The dresser and the nightstands sold quickly, within a day of posting them. Yeah! My foyer is getting emptier although I still seem to have the red desk. Even before I painted it, it was one of those pieces that just doesn’t seem to appeal to anyone. It is a great little piece, and I have lowered the price to the point where I won’t make any money on it. I wish I had a place for it myself, as it is beautiful, but alas, I do not.

And I am just waiting on the pneumatic stapler that I ordered online so that I can finish up my upholstery projects. More denim! And that should clear the final pieces from the foyer and the garage. It should be simple at that point to re-arrange the final stuff in the garage to get two cars back into the space initially designed for cars!

I’ve got a couple of small project lined up to keep me busy while I am working on the last couple of big projects. Seems like it is both taking forever and time is just whizzing by while I wait for this upcoming surgery! And in the same way, I am both excited and terrified about it!

julie

Finally, Work Has Begun on the Denim Rag Rug

I seem to be guilty of working on many projects at once, and because of it, they seem to get completed at the same time. When that happens, there seems to be a roller coaster effect on the blog… many posts in a row, then nothing for a bit, then more posts. I wish I was better at planning or managing my work, but it is what it is.

Right now, my focus is getting things done that will be a) in my way once I have my double knee surgery and b) those projects I won’t be able to do because of the recovery. So, the garage is once again full of multiple projects being sanded and readied for priming.

Let’s see… there is one dresser, one chest of drawers, that little vanity that is about to become a pair of nightstands, my entry way pew (I can’t wait!) and headboards and foot boards waiting to become a couple more benches.

I am also determined to finish a project that I started about a hundred years ago… a table sized regulation Scrabble table!

DSCN4206This is the table base. The top is almost done, its been painted and the striped… all it needs is the special squares marked (you know, “double letter score” etc) and a finishing edge to the table. I’ve made the Scrabble tiles and the holders and then just to put it all together. I can’t wait to actually play a game on it… its going to be awesome!

I’ve been working on a couple of other small projects in between the big ones. One is for The Kid and his recent love of vinyl. As in music records. Whenever we hit the second hand shops and thrift stores, there is always at least one or two worth buying. His 45 collection is growing quite nicely and he needed somewhere to keep them, rather than in a flat pile on the desk. So, I am building this:

DSCN4207Its been primed, and I am going to finish it with a coat or two of my favorite Deep Space black high gloss paint. I made this in a day using scrap lumber (the bottom is actually paint stir sticks!!).

Whenever I get overwhelmed with how much is going on in the garage or it is a bit too cold to work in the garage (note: buy kerosene for garage space heater), I escape to my sewing room. I’ve been purchasing and prep’ing old blue jeans in anticipation of making a denim rag rug. So, after removing waist bands, pockets, zippers and seams, I have a nice pile of denim. The next step is to cut it all into 3″ strips in preparation for braiding.

So, I spent many hours tucked safely in my warm sewing room watching streaming television. I am having a difficult time estimating just how much is going to be needed to make the rug I want… or how large of a rug I can get with what I’ve got. I guess I will see when I start braiding. Saved for recovery time!

And speaking of, I am also planning on hand quilting that quilt I found some time back.

2015-02-18 16.45.07I’ve replaced the torn patches and added a new border and have a great backing material. Then I went out a purchased a hand quilt frame in anticipation (along with the wool batting) for time to hand quilt it and have been mulling over what pattern but right now, I am leaning towards just ‘stitch in the ditch’ of each and every triangle. Maybe I am overestimating how much free time I might have?

julie

P.S. I’ve been thinking about redesigning the website, mostly because the design blocks reader comments. I’ve been wanting a OMCS logo for a while, to start attaching to photos mostly – as they are popping up all over the internet, many without redirection back here. I’d love to hear from y’all… suggestions?

The Great Experiment Continues!

The last post I made, I explained how I was conducting a little experiment to see if it would be possible for me to simply live off the money I make “creating”. This week the experiment continues.

I had just the most awesome luck last week in running across quality pieces from a number of places. In addition to furniture pieces, we really made out with our ‘thrifting’ trips as well. I found a ton of old quilting books, one that dates back to 1949! Its really neat to see the way that women used to quilt before the adventure of rotary cutters and our fancy-schmancy sewing machines! Gives me a new perspective on just how good we have it!

IMG_8502And one of our favorites just happened to be clearing out their inventory of clothing. $1 for every stitch of clothing in the store. Couldn’t pass on that deal – so yes, I snagged another ten pairs of jeans. I have about a hundred projects going on it seems, but deals like that cannot be passed over! By now I am sure that I have enough denim to make a rag rug at least 20 feet round!

IMG_3254The Kid and I have been steadily working, but with days in the high 90’s and temps reaching into triple digits, it isn’t easy to spend too much time in the garage with heat and the paint and glue fumes. We’re made a lot of progress on quite a few projects in that time, though. I expect to have at least three or four ready for reveal this coming week, but until that I will just leave you with some parting pics!

DSCN3682Who said garages were supposed to be for parking your car?DSCN3685Part of our week long bounty. And I have ideas for all of it!

DSCN3686And yep, you’re looking at a pew! Lord only knows (pun intended!) where this will go, but it is solid wood and gorgeous! How could you say “no” to something like that?DSCN3690Projects have even spilled back into my kitchen! I can’t wait to show you this piece… it started out looking like this:

00t0t_heezBoCqAMt_600x450Prepare to be amazed! Or not. You decide! 🙂

julie

Deconstructing A Pair of Jeans With the Least Amount of Waste

I recently found instructions on how to create a rag rug. Of course, I want to try to make one with denim. And not new denim, but the soft, broken-in denim, like your favorite pair of jeans. And the best place to find that is, in fact, an old pair of jeans. Or rather, in a lot of old jeans.

So I started collecting old pairs of jeans. Off to my favorite thrift stores and second hand shops. Actually, I wanted a nice variety in the colors, so I picked some that looked new and were dark blue, and I picked out some that had wear and fading and were almost white in some cases. Then there were pairs in the middle, a nice hue of blue, some with fraying and some with spots – like the thighs or knees or butts. I started looking for the larger sizes and the lower priced pairs.

Side note: Even thrift stores have sales! The stores that we visit seem to have a color rotating method. It keeps stock fresh and making room for new arrivals. Always check at the front for which color is discounted.

So, The Kid and I had hit a GoodWill store on a different side of town while we were out delivering a dresser. The colors of the day where white and yellow -50% off – so I headed to the men’s jeans section. I found ten pairs of jeans in sizes larger than 42″ waist sizes marked at $2.48… so I walked out of there with lots of denim material and only spent about $12! Couldn’t buy that much new material in a store and this was soft and had a variety of colors.

Then it was time to take apart the jeans. I searched the internet for instructions, but I either found ways to do it that were inefficient (taking the seams apart with a seam ripper – yeah, right) to those that wasted too much fabric. I had instructions for using other portions of the jeans, like the waistband and outside seams, so I didn’t want to waste anything.

So, I decided to write my own instructions as I took apart the pants. There are a couple of terms that I will use that might not be obvious to all readers:

a. I will refer to the thread as gold, although it may be a different color.

b. If you’re not comfortable handling a single edge razor, a seam ripper could be used, but it will dull very quickly. In fact, the razor blades that I use are really only stay sharp through two to three pairs of jeans. Once I find some resistance in pulling the razor blade, I switch for a new one.

c. I will refer to seams as “inner seam” and “outer seams”. Inner seams are folded in and have no outside stitching, while an outer seam has the bulk on the outside and will have decorative gold stitching:

Inner:Outer SeamsOkay, let’s take apart some jeans:

1. First up is removing the brand label. Not all jeans have these, although I have found that most do. I found a cute use for them, by re-attaching them all to a denim pillow. May or may not do this, I guess when I’m done with the rug, I’ll see if I have enough.

DSCN34752. I have found the fastest way to take apart almost everything related to the jeans. Slide the razor blade at a corner and carefully pull towards you. Continue all the way around.

3. Jeans are tough. And one of the things that make jeans so long lasting is the reinforcement at stress points. Like the back pockets and belt loops and bottom of the zipper. The key to making it easier to deconstruct a pair of jeans is in tackling these reinforcements. Cutting through the reinforced seam is the most straightforward and easiest way to loosen the remainder of the seam.

DSCN34744.  I start by cutting through all of the belt loop reinforcement – just the bottom, where it actually connects below the waist band. Then, one by one, pull the belt loop away from you and using the blade, cut just the gold threads.

5. Next, we’re going to remove the waist band. I actually have a project that will use the waistbands and the belt loops attached (at the top), so it is important for me to cleanly cut the seams.

6. I find a spot where the seam isn’t reinforced or that it has more than one row of stitches. And then it is just a matter of cutting all those seams. I find this to go pretty quickly, the two areas you will find that need more attention is at the the ends – where the button hole and button come together. Just keep pulling back on the seam to reveal the stitches.

7. Next we’re going to remove the zipper and all of its components. I know some would like to keep the zippers, but in my case, I know that I would never reuse them. I rarely use zippers, but when I have, they have been much longer than the ones that come from these jeans. This is the first waste product.

Using sharp scissors, cut as close as you can to the outer seam.

DSCN3515Continue all the way down around the curve to the seam.

DSCN35168. Then repeat on the other side of the zipper.

DSCN34909. Now continue cutting to the side of the ‘out’ seam. This will continue around to the waist in back (between the pockets).

10. Now you have essentially two separate legs. Now you want to split the seams to capture as much of the fabric as possible. Start by cutting along the outer seam all the way to the bottom hem. Cut through the hem.

DSCN349311. Now cut off the hem and set it aside. I actually have used all of my hems in a very special project. It is SO cool! Just because I keep and use something, doesn’t necessarily mean you will, so keep only what you want and can use.

12. Now, lay the pant leg out. Then fold it in half, right sides together based on the inner seam. Now, cut off the inner seam, keeping as close as you can to the seam.

13. As you cut the inner seam, you will fun into the pocket as it is incorporated into the seam. Translation? Many layers of fabric! So once you have reached this point, open the fabric and cut with as few layers as possible. You also may have to contend with rivets at the pocket site. These can be heck on scissors, so be careful!

14. On the front (with the pocket) cut the outer seam to remove the pocket. I have a project in mind for the mini-pocket (or change pocket) so, I cut away most of the pocket construction and the white portion. I try to leave some fabric around the smaller pocket, so I can accomplish this other project.

15. Now time to remove the back pockets. You could actually do this at any point in the project, but I like to have everything already done and then sit down on the couch with my box of razor blades and remove the pockets while I watch television.

2015-05-12 21.11.10Again, pull the sharp edge across the reinforcement at the both corners, once or twice. Once you’ve gotten past the reinforcement seam, the remainder of the pocket is pretty easy.

I’ll share with you my little secret. Some of this fabric is going to be used to upholster a wing back chair. And removing the pocket reveals a darker fabric underneath and adds more visual interest. Even if you are cutting the fabric for use in a quilt or some other project, the difference between the faded and not-so-faded fabric.

16. Steps 10 through 16 as necessary to complete the deconstruction. When you’ve done, this should be the total pieces from a single pair of jeans to be discarded. I save the outside seams but the not the inside seams.

DSCN3518And here is my bounty. This pile represents about 30 pairs of jeans, ranging from size 30 all the way up through 54″!

IMG_4209The fabric shown in the photo above, is to be cut into strips and then braided into the denim rag rug.

Screen Shot 2015-06-05 at 4.19.00 PMI actually have much more that I am deconstructing slightly different as I am using it for a upholstery project. I got the idea from the photo above. I just love the juxtification between the formality of the chair yet informal fabric of salvaged denim. The small hints of pockets and seams just adds to the overall delight.

My chair is a little different than the style above, the back has a tufts rather than a flat surface. And this is where the different shades of blue will bring such a uniqueness to it.

Here are some other images that influence me:

Okay, that’s it for today. If you have further questions, comments or suggestions, I’d love to hear them!

julie

A Little of This, A Bit of That, More of Something Else

Do you ever find yourself pulled in many directions at once? Well, that’s me for the last week or so. I feel like I have so many irons in the fire and yet, never feeling like I am accomplishing anything. At least not accomplishing enough.

I will share with you a project that has been in the works for sometime. Way back, I was given a wonderful gift of four antique phonograph player cabinets. An acquaintance of mine does old fashioned Victrola type restorations and much like anyone who restores things, it often takes two or more pieces to be able to get something that old working again. So, my friend would strip the cabinets bare of the music parts and then not have anything to put back into them.

01414_146BGjp6j5f_600x450I was able to fix up two of the four I received pretty quickly. I love how they turned out. I like one so much I opted to keep it – yes, it was done in my signature red color. But it was extremely handy to have my financial information all in one place and look good to boot! You can read about it here.

This photo shows the four I received. Like I said one sold quickly, and you can see its transformation here.

I did some preliminary work on the other two, but we were pulled in many directions and the other two went into the “To Do” section of the garage. That space was arranged and re-arranged a dozen times. But I knew I would get around to them eventually.

Eventually was this week for one piece. I stumbled onto a color when I was sorting through paint chip cards and have fallen head over heals for it. It is called ‘Deep Aubergine’ and it just screams elegance. So, being (sort of) close to finishing the third Victrola cabinet, I opted for a quart of this beautiful color.

DSCN3384This is one of those colors that is just plain hard to photograph accurately. Trust me when I say that this is a gorgeous color in person. Its a deep brown with just a hint of ‘purple’ in it. But you can see the difference in how it photographs between this photo and this one:

DSCN3385Either way, it is gorgeous! I had to replace the top, it seems that the tops of all this cabinets were the first to go. The right side of this cabinet had a horn that was covered with the dropping front.DSCN3387That piece then can be slid into the cabinet to keep it out of the way (when they were listening to music). I loved the construction and only briefly considered changing it. The other side has an added shelf to use for storage. I think this piece would be nice as a entry way or hall cabinet. I think grandmother’s silver box and the good crystal would fit nicely into this cabinet.

DSCN3386So, I have a number of other projects in the works as well. I stumbled onto a thrift store that had all their clothing marked down to $2… so I snatched up all of the jeans I could find. I spent the better part of the last two days with scissors, seam rippers and razor blades taking everything apart. I am planning to use the fabric to make a denim braided rag rug. I’ve seen a few photos and they just look awesome! I have plans for almost the entire pair of jeans – I am going to use the seams and waistbands with belt loops – I even have a plan for the back pocket label

2015-05-12 21.11.10Sitting and working on this gives me a chance to catch up on some of the old movies I missed the first time around. I love streaming content! I am taking full advantage… we have AppleTV, Roku and Amazon Fire!

2015-05-12 21.10.52The Kid and I are, once again, giving gardening a try. Last year we did pumpkins and the year before watermelons. Didn’t have luck with either of them. This year I am trying tomatoes and The Kid is planting sweet corn. Which of course reminds me, I have to get down and weed the strawberry patch. This is the third year for the strawberries and this is supposed to be the year that they really bear large and flavorable berries.

Oh, and we’ve got the antique chandelier that we rescued out of an abandoned farmhouse. I’ll provide all the info when it is complete. Like I said, we have many irons in the fire… we are constantly doing something around here.

julie