A couple of posts back, I showed you another of the suitcase dressers that I had completed. I had a comment or two from readers that said they really liked the concept but could find no instructions or tips or any other helpful information on how to recreate the look. Well, I have been working on a short console type cabinet for a client that I decided that I would do a tutorial on how to make the suitcase dresser, or at least, how I do it.
Okay, I have done this about four times (and I have another under way). The particular pieces of furniture that I chose are those sound in structure, but devoid of any real character. Like this dresser.

I took the drawers out and removed their hardware. This left this odd bumpy pieces that under closer inspection appeared to be attached to the fronts. A little prying and they came right off. They were attached with three very long staples and made of pressed wood. Basically useless.
 I discarded those pieces.

You can see the long one leaning against the front of the drawer.

So here are the drawers with clean fronts ready to be worked on.
Oh, and speaking of ‘clean’, it is always a good idea to wipe down everything with a clean cloth avoiding chemical cleaners. You don’t want anything interfering with the bonding of glue and drawer front. Wipe out the interiors of the drawers and the inside of the cabinet. Nice to have everything clean to start with.

Next, I made a couple of trips to my local hangouts; Joann’s and then Home Depot. First I chose fabric. I knew the piece was to be primarily black (cabinet is the ‘usual’ Deep Space black in semi-gloss from Behr). I painted the cabinet and set it aside. I would have to do two coats to get a nice even coverage. Below, you will see the two fabrics I chose. I purchased the width of the drawer plus 4 inches, enough to wrap around the top and bottom edges. This will make sense when we get further.
The type of fabric used is as least considered an upholstery fabric. I like to use styles and colors that mimic what I think of when it comes to older suitcases, something around the 50’s and 60’s. I collected these images to give you a place to start. Let you imagination take you wherever you want to go, who is to say what is or isn’t suitcase fabric? Also, remember you can always use just about any colored vinyl. Let’s you really get a pop of color in there.

Here you can get an idea of the weight of fabric, it does need to be a heavier type fabric. Working with a heavier and more stable fabric is easier and it will wear longer. Not all upholstery or furniture fabric will work, you have to be careful of glue saturation. More on that later.

Here are several examples of fabrics that I have purchased to use in upcoming projects. You can see the wide selection of colors and patterns.

Next I cut off the selvage. I am also a quilter, so I use the cutting mat and rotary cutting tool and straight edge tool that I already own. You could just as easily use a scissors to cut off the edge.

Now measure the length of the drawer adding four inches. Now cut the length.

Now fold the fabric onto itself into about thirds. What you are doing here is to make a crease in the fabric to replicate the lid meeting the body of the suitcase.

Pin to hold the fold. You may want to pull the fabric back and look (at the right sides together) to make sure that your fold placement looks good. For me, it was trial and error the first couple of times. For the most part, I figure as long as striped or obvious patterns look right and match appropriately.

Sew about a 1/4″ seam. This doesn’t have to be perfect measurement, again, as a quilter, this is what I normally sew. And I don’t lose too much of the fabric to the seam.
Now open the seam and press. Sometimes, when the fabric is really heavy, pressing helps to maintain a nice flat surface when you apply the fabric to the drawer front.

Now apply a liberal amount of glue mixture to the drawer front. I use a combination of about 4 parts white glue (good ‘ol Elmers, I buy it by the gallon size) and 1 part water. This makes it just a little easier to work with. Now working with the fold towards the bottom, place the fabric evenly on the drawer front folded… then unfold when the line is straight. Believe me, when you are all done and that seam is crooked, it will jump out at you and you will see it every time you look in its direction!

Now unfold and smooth the remainder of the fabric. Start at the center and work out to ensure a smooth coverage. Be careful not to pull when you smooth and move the fabric.

In most cases, I use those big office binder clips, to hold the fabric as it dries. You will only be doing the two long edges now.
Two things you need to be aware of if you leave the clips on too long … one, these clips can possibly leave rust if the fabric is saturated with the glue mixture. Two, you can get a crease line when the glue dries where the binder meets the fabric. These can be avoided if you leave the clips on long enough to allow the glue to ‘set’ but before it dries. Again, this is just a matter of trial and error.
Occassionally, if there is not enough ‘lip’ on the drawer to support the use of a binder clip, I will use a stapler. Just a regular stapler, not a heavy duty one. This is just to hold the fabric in place until it dries enough to remove the support.
 Another view of the fabric drying:

Once the fabric has dried enough to maintain the connection to the drawer, remove the binder clips. To use these on a multi-drawer dresser, you will need quite a few of them. Allow the glue to dry at least overnight, better if you can give it the full twenty-four hours recommended.
This will be where you will see if your choice of fabric was good. I didn’t plan this, but it ended up working out okay since I am doing a tutorial. After all, a good tutorial will also tell you what not to do as well as what to do.
In this case, this fabric wasn’t a good choice after all. The glue soaked into the fabric to the point that when it dried, it discolored the fabric. It is pretty difficult to see in the photos, but where the glue was too thick, it discolored the fabric.

I was able to pull the fabric off without any damage to the drawer front. Off to the store for a replacement fabric, this time I dropped by Hobby Lobby to check out their selection. I found a beautiful black and shades of silver/gray with circles to replace it. Back through the steps to get the second drawer caught up to the first.
Once the long edges of the drawer have been dried, you need to repeat the process to the ends. This is usually much easier since they are shorter in length. Again, another 24 hours is recommended to allow the glue mixture to dry.
Now, you need to trim the excess from the drawers. This process is dependent on the specific shape of the drawers and how they fit into the cabinet. I usually chose drawers that lay on top of the cabinet as opposed to being recessed. Perhaps this photo will help clarify what I am talking about:

Drawer styles vary, but again, I like to stick to drawer styles that are similar. I trim the fabric under the drawer first, using a sharp razor blade to remove it where the drawer front meets the drawer. Using the inside corner as a guide, pull the blade along to cut the fabric. Trim the edges using the razor blade or a small pair of scissors.
 Pull the fabric away as you move down the drawer. This helps to see where you might need to re-cut; remember, this is heavy duty fabric!

Once you have the fabric removed, apply more glue to the edges, trimming away errant threads as you go. Be liberal in your glue application, you want the edges to stick well!
Another waiting period for glue to dry. Then it is time to install hardware.
First, let me talk a little about hardware. I think it looks better to have a variety of styles and colors. Otherwise, you are back to looking like it is just another dresser. I keep my eyes open in many places I shop for possible candidates. One place I love to browse through bins is Habitat for Humanity’s ReStore. They have some awesome old and unique pieces. Often dirty and without mates or pairs, but all the better. And usually either 50 cents or a buck!
I always peruse the hardware aisles at Home Depot, Lowe’s and Ace Hardware, but you can also look at places like Michael’s, Joann’s and Hobby Lobby. Occasionally, I will find good stuff at the dollar stores and thrift stores. I browse eBay and Craiglist too. Because I know I will be doing these from time to time, I like to keep an eye open all the time and in the end, this gives me a good selection to choose from.
Here is are some examples of what Home Depot has to offer:

Position on the drawer front to suit yourself and attach. On one drawer front, I used a piece of a leather belt (picked up at Goodwill for $1.98) and two pipe straps to simulate a leather suitcase handle.

Next, as clasps for the case I used silver window sash hardware one on each side, about 5″ from the edges:

The other drawer was treated with a black gate handle, nice and solid:

And it also received the window sash hardware, this time in black. Also, to vary the hardware location, I mounted these about 4″ from the edge. Just to keep from getting to repetitive and keep things looking different.

Insert the drawers into the cabinet, take a step back and let out a long overdue and well deserved sigh. You should be done at this point. A few more photos of the completed project. First, a close-up of the hardware, you can see that things don’t line up and that is on purpose.

A step back to view the whole thing, cabinet included:

Another shot:

Whew! About two thousand words and pictures! pictures! pictures! I hope this all makes sense, but if you have questions, please ask! Like I said, I have done this four or five times now and I may have taken a short cut or two without realizing it. Once you do something a few times, you kind of know where you can cut corners but is information that would be helpful when trying to show someone else how to do it.
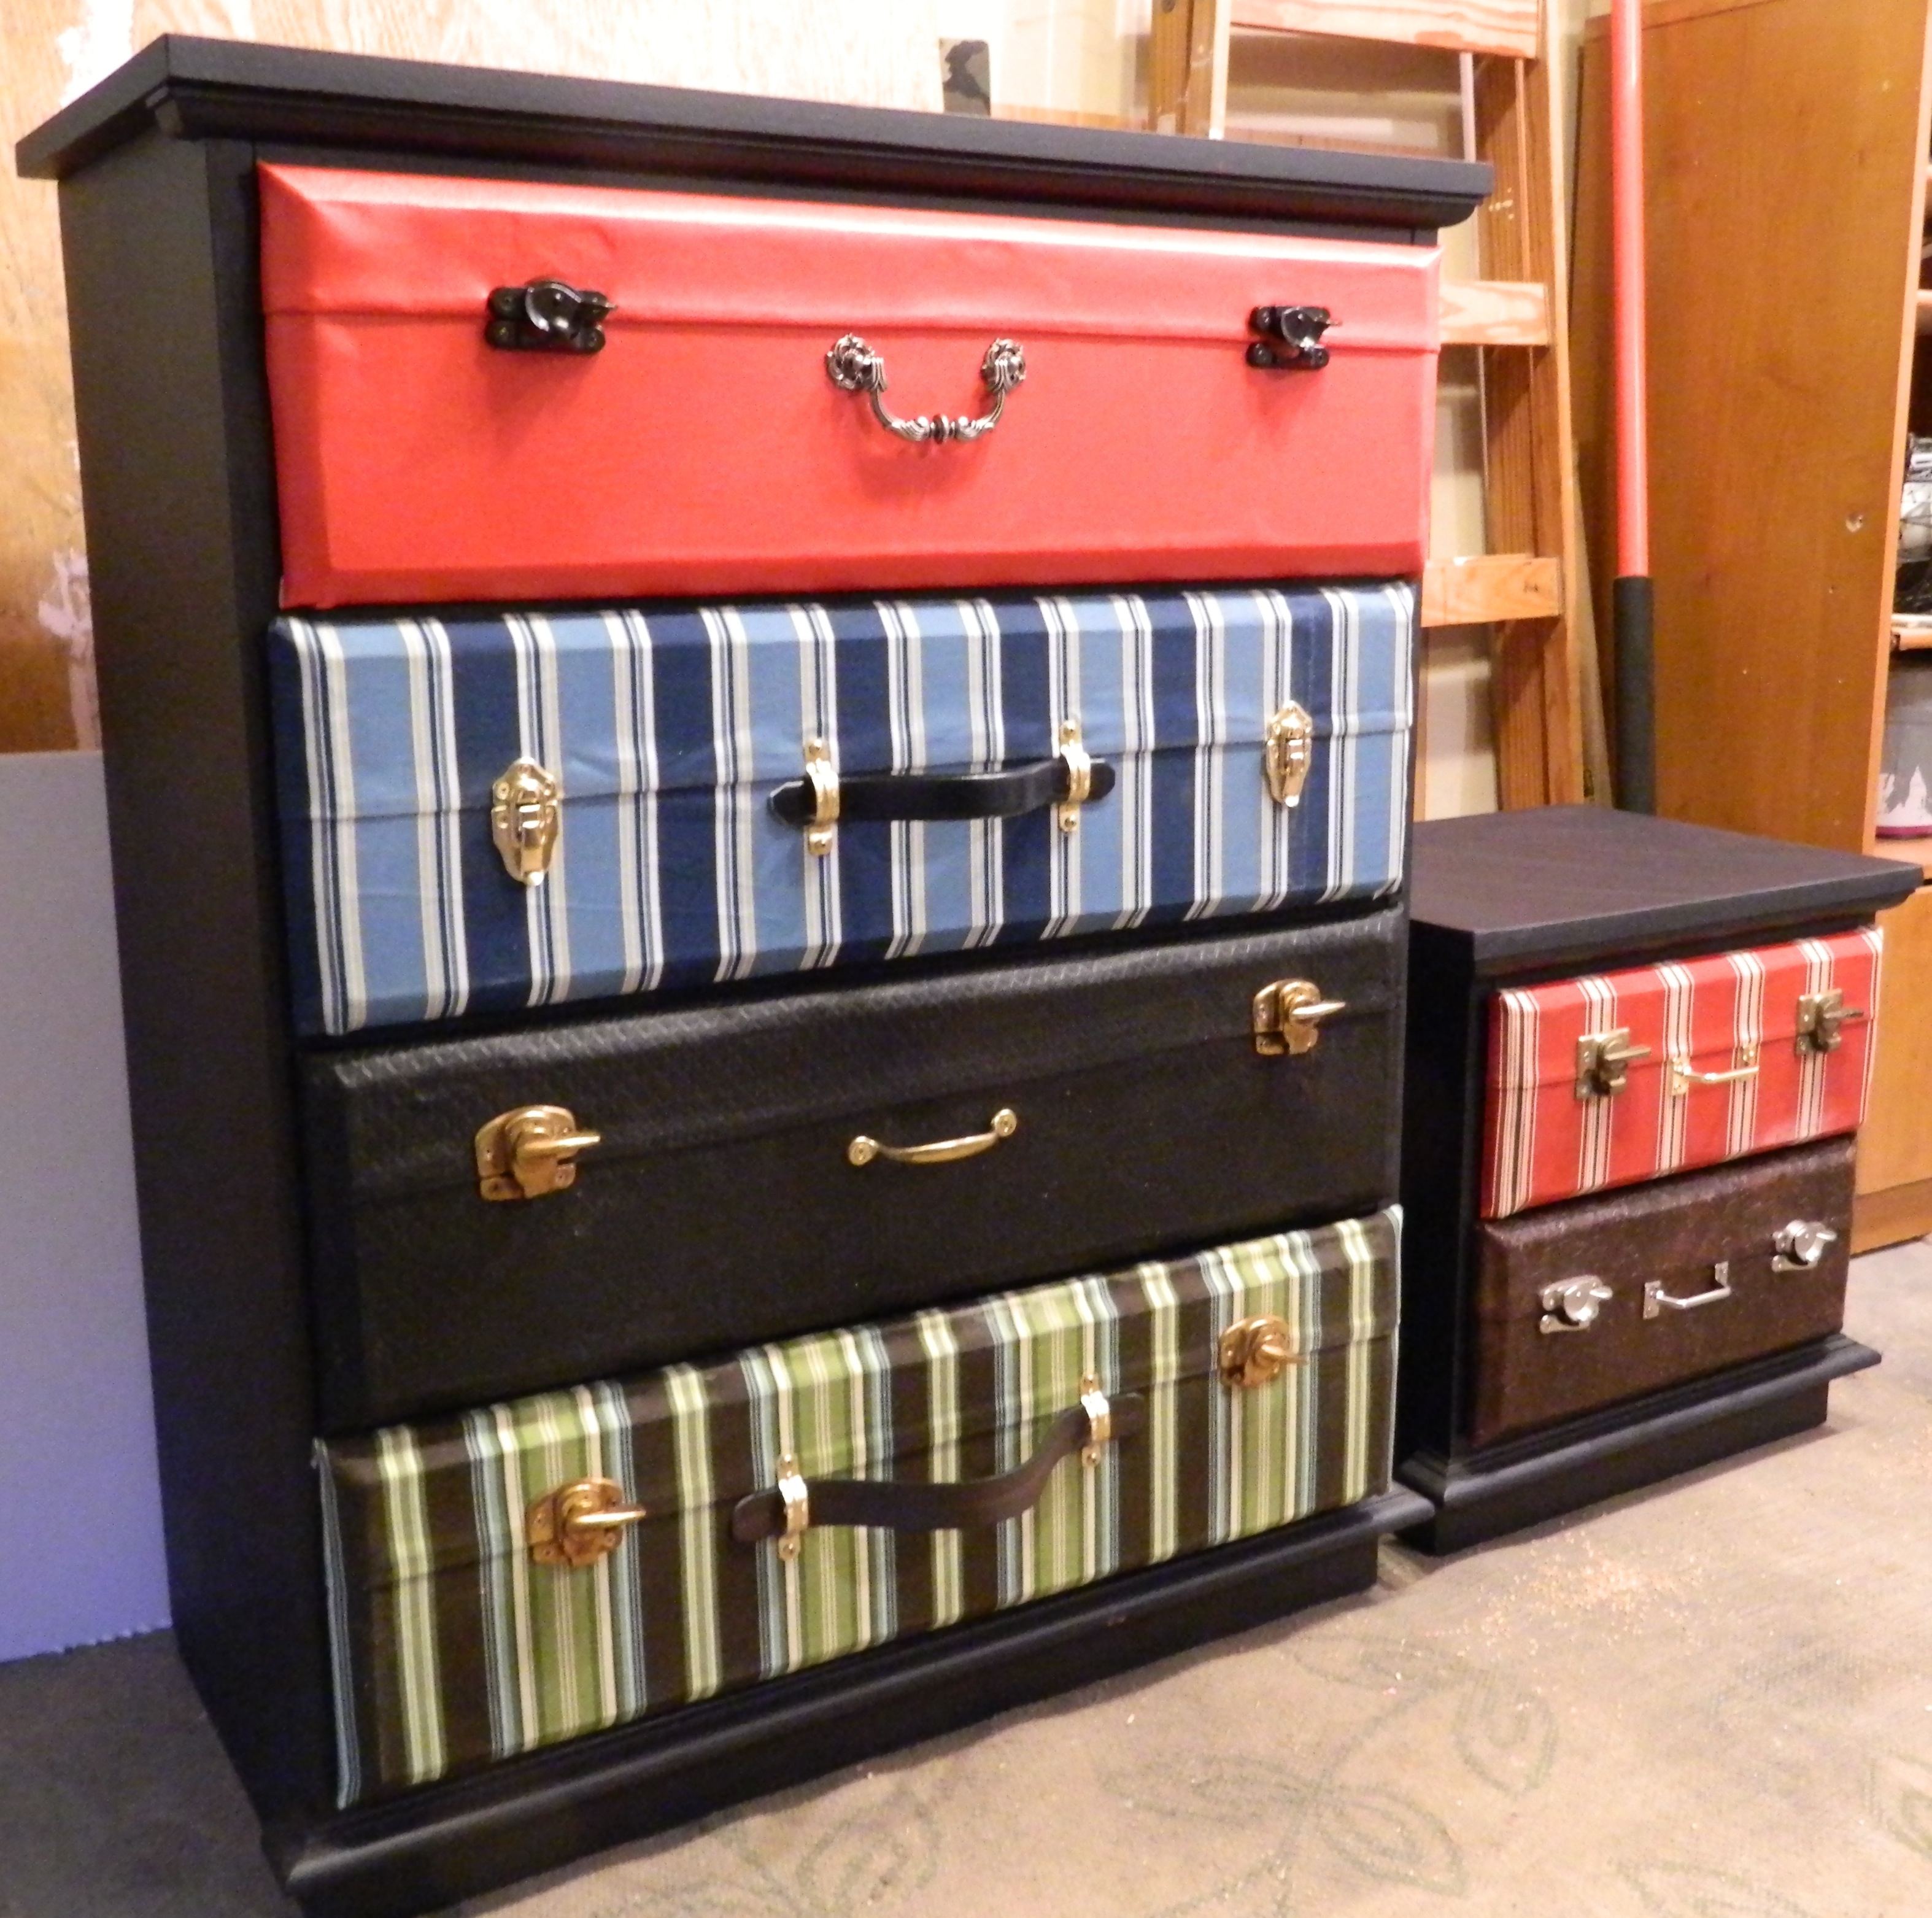
Oh, just for fun, here are the other dressers that I have done, the first one even had a small matching nightstand:
and the very first effort:

This one shows you a before and after shot:

Okay! I will say goodnight! I loved doing this tutorial but had no idea that it would take nearly 5 hours to write. Glad I was taking photos along the way.
Thank you for dropping by! Come back again!
And keep crafting y’all!


Hello you have a nice blog. I wanna thank you for sharing this cool articles with us. Keep up this good job.
This is INSANELY fabulous!! Going to have to try it myself 🙂 I am so impressed by all your creative ideas!
❤ this project. Excellent job. I thought they were actual suitcases until I read through the post. I want a whole wall of these for my dream workspace. Thanks for all the work going into this post.
Thank you so much! I now know why its called a ‘labor of love’! But I do love this style and it does seem to sell quickly. Thanks for visiting the site! Please come back soon!
Julie, this is incredible! I’m totally impressed! It would have never occurred to me to do this and now I MUST make one! Thank you so much for taking the time to do this.
Wow Julie – your rock! Your creativity is energizing. What a lot of work but when you love what you do it is a very satisfying exhaustion, no? Bravo – will share with friends who will totally appreciate your work.
Pingback: 21 DIY Ways To Make Your Child's Bedroom Magical | Bringing the best news to the People
Pingback: Jeobox – 21 DIY Ways To Make Your Child’s Bedroom Magical
Pingback: Ideas Muy Mágicas Para Decoración Infantil | Bastísimo
hey where did you get the dresser? so cute
Happy to welcome you to my blog! I often get dressers free from CraigsList, I have an ad that I run almost constantly offering to take old furniture off people’s hand (and out of their garages and storage spaces) for free! Some folks just want things gone. For those in less-than-optimum shape, I scavenge for parts… and often use the drawers for other purposes. I have rarely purchased dressers, but occasionally I will run across one for sale for $10 or $20 and if they are of good quality, I will spend the money.
Pingback: Stop Throwing Away And Start Sprucing Up | The Sneerkat Chronicles
I’m trying to father the courage to tackle this….. Soooo unique:)
It really isn’t difficult, just many steps and taking your time. Good luck!
This is amazing!! Im so impressed with your skill and creativity! I hope one day I can try this and it looks half as good as yours. Thanks so much for posting the tutorial! 🙂
-Kat
Thank you for your kind words! It really isn’t all that hard… just jump in!
I’m definitely going to try it out! 🙂
Looking forward to seeing your results! If you have any questions, don’t hesitate to ask!! Good luck!
Thanks so much!! 🙂
Wauw this is so beautiful. Greetings from holland.
Thank you Janny! And greetings from the US!
Pingback: » 21 DIY WAYS TO MAKE YOUR CHILD’S BEDROOM MAGICAL.
Reblogged this on BettyBelles and commented:
What a sweet idea…
Pingback: 21 ideas “hazlo tú mismo” para que la habitación de tu hijo sea mágica - igopeople.com
Gracias por incluir mi tocador ‘maleta’ usted. Ama a tu puesto!
Pingback: Lately, I Have Been So Distracted! | On My Creative Side
Pingback: Creative Ways to Recycle and Reuse Vintage Suitcases
Pingback: 18 Out Of This World Ways To Transform A Boring Old Dresser (Tutorials Included!)
I see you posted this a couple of years ago; but, I just found it and I love it! I have been redoing dressers and transferring pictures with decoupage. I wanted to try something different and your instructions are so clear and helpful. Thanks so much for posting!
Thank you! Wow, has it been that long ago? Whoa! How time flies!
I’d love to see photos of your work! Do you have an online presence?
Pingback: Magical decorating ideas for Harry Potter fans
Pingback: Great Ways To Recycle Those Vintage Suitcases - 12thBlog
Pingback: Chcete mít pracovnu v kufru?
Pingback: Creative DIY Ideas with Old Suitcase - Flux Decor
These are so fabulous!!!! I am redoing my girl’s bedroom with a Harry Potter theme and am going to give it a shot! Thanks for sharing 😀
I am so happy you found it! I’d love to see your project when you’re done!!
Pingback: 15 Awesome Ways To Make Your Boy’s Bedroom The Envy Of All His Friends
Pingback: 15 Awesome Ways To Make Your Boy’s Bedroom The Envy Of All His Friends | Prepper's Survival Homestead
Hi, what a great post! Would I be able to use a couple of images of the finished piece in an article I’m writing? I will link back to your original post of course 🙂
Thanks
Please do! This is one of my more popular posts and I love to be included on other’s sites! Thank you!
Brilliant, thank you!
Pingback: “Suit” Up and “Draw” | Repurposing Used Items into Household Decor
Pingback: How To Upcycle An Old Suitcase - DIYCraftsGuru
Pingback: Reusing the Vintage Suitcases: The Ultimate Redesign Projects | Decozilla
Pingback: DIY Dresser Makeovers with Impact | Decorating Your Small Space
Pingback: 21 DIY Things to Make With Old Suitcases | Home Design Lover
Pingback: how to give an old dresser a fancy facelift | creative gift ideas & news at catching fireflies
Pingback: 21 DIY Things to Make With Old Suitcases – Breachel.com
Pingback: Amazing Ideas To Upcycle An Old Suitcase - DIYCraftsGuru
Pingback: 21 DIY Ways To Make Your Child’s Bedroom Magical - Viral Tunnel
So AWESOME!! I LOVE IT! What a FAB way to repurpose an yucky chest of drawers! THANK You for sharing!!
Thank you! Its funny to think that this little idea would cause so much creativity! I love getting comments and especially one -like yours- full of exclamation points! I love to think that I have inspired a few people out there!
I love this, I can’t wait to try it out ❤️❤️
Just a quick question. On the tall six drawer set I see gold/brass pipe fittings. Did you have to spray paint these? I cannot find that color. All I can find are silver and copper which is pinkish.
To be perfectly honest, I cannot recall! I often paint fittings so it is entirely possible… nothing beats a great can of spray paint!
Thankyou for all your time to make this tutorial. It will make my first attempt at doing a suitcase dresser much easier. Hopefully I can get fabrics with a lot of white or antique white as base color. Patterns will vary, but trying to make it simple chic!
Thank you! I’d love to see your finished product if you’d be so kind as to share!
great idea, but too much hassle honestly..
kudos to you
The more you do, the easier it gets. But I understand and thank you for stopping by!
Pingback: Before & After - Suitcase Dressers
Pingback: 39 Ways To Transform Your Old Furniture - DIY Wood Plans Today
Amazing Tutorial!! I love the look and the tutorial is detailed enough that I think I can take on this project 🙂
Hello, I really love this project. I am starting to get into crafting as a business. If you have not I wish that you would do a video of this project.
I hope the instructions are good enough as there is no video. I often improvise things and when they turn out well, I try to recreate the steps exactly but sometimes there might be something I forgot to include! I look forward to seeing your end product.