 Well, I say “finished” but is anything ever really finished?
So, way back I showed you the new cabinet added to my sewing room. Because it came with a plain front – rather than the beadboard finish that is on every other cabinet in the room – I attempted to change the doors on this new cabinet to match.
At first, we tried to use the thin sheets you can get from any hardware or big box store.
First we cut them to size for each panel:


Then we slathered on the glue, placed the beadboard and then weighted it down with whatever we had in the garage. You can see we used paint cans, a small anvil – even boxes of Diet Coke.

 After leaving it overnight, I came out the next morning to find that the glue hadn’t ‘stuck’ to the door panel, only the beadboard. Back to square one.
I did some investigating and ran across a wallpaper that looked like beadboard. It couldn’t hurt to try, right? I ordered one roll and waited. It finally came and attempt number two was started.
Since I wasn’t using much, I opted for premixed wallpaper paste. Using a four inch roller, I slathered it on heavy.
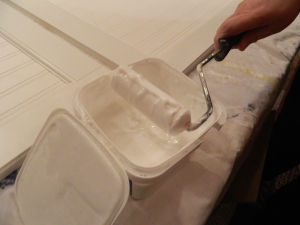
Rolled the wallpaper on top and smoothed with my hands. Then using a sharp blade, I cut the piece to size using the edges of the trim.
 Wiped up any excess paste…

…did all three panels the same way…

And here’s how it looked. Left it to dry overnight and went to sleep with my fingers crossed.

Here is both doors (three panels):

Came out the next morning and it looked great! Yay! However, as I kept looking at them, I felt like something wasn’t quite right. The bounding trim was very glossy but the paper had a matte finish. I thought I would just set them up and spray paint them glossy white.
Good idea, except the paper never really dried. It was just sort of sticky. In a room where dust and material fragments and threads would be everywhere, I knew this wouldn’t be good. I opted to spray it with a glossy clear sealant. Now, there was a chance here that this would only make things worse and not resolve the issue. But I figured I could just stick The Kid in the truck and point him in the direction of IKEA and get him to buy replacement doors. It was worth a try.
And it worked! Next morning the stickiness was gone and the doors were all shiny! Next step, installation.
Doesn’t it look like we bought it that way? I love this idea and may be looking for more ways to use this!
A couple more pics of the new cabinet and some of the other changes as a result:

Added some more “buttons” and one still not up yet:

New shelf along the ceiling line… those boxes hold so much! I have completed quilt squares and lots and lots of cut pieces just waiting to be turned into more quilts.

Had to turn the button board vertical to fit. Had to move some other pieces, like the tack board, to another part of the room. Added some new things as well to the mix, such as this “puzzle box” of sewing attachments made by Singer in the early part of the 20th century.

Here is where the tack board went. The top is a photo of The Kid when we had just adopted our puppy.

Here is an older shot of the cabinets along the back wall and turning up to the window. You can sort of make out the beadboard fronts.
Okay, now that this is done… I need to turn my attention to the third stall of the garage. It is where my sports car needs to be housed during what we expect to be a pretty snowy winter. I need to get the STUFF either done or out of there. I really just want to play in my sewing room… I just bought that new embroidery machine and can’t wait to get started. But first things first.

